Problem: I have multiple websites on a Windows 2008 server (using IIS7), and I need to enable SSL (i.e., https:// connections) on more than one of them.
Generally, secure websites get their security certificates from trusted providers. Most modern browsers verify that the third-party certificate came from the purported vendor and are attached to the purported website, and give you a nice warm feeling when your address bar turns green. (I have used Comodo most of the time, though because of some experiences helping a local small business renew their certificate recently, I might switch.)
The way SSL works, however, you don't actually need third-party verification to keep the conversation secure. Many servers issue their own SSL certificates, which secure the traffic between the browser and the server regardless of which server or who issued the certificate. In other words, a self-signed SSL certificate will keep the conversation private without guaranteeing that you are talking to the person you think you're talking to. If you can confirm the identity of the server through other means, and then trust the certificate, then you're golden.
Because only I or my subcontractors will ever need to visit these administrative sites within Inner Drive Technology's Worldwide Data Center that I want to secure, self-signed certificates are perfectly appropriate. Under previous versions of IIS, not only did this cause enormous headaches, but also IIS would only support one and only one secure site per server instance. That really sucks if you have, as Inner Drive does, about 30 sites on the same server.
IIS 7 makes this so simple I almost cried with joy.
Step one: Issue a self-signed certificate
In IIS7, go to your server node, and open up the Server Certificates feature:
In the Actions list, click on "Create Self-Signed Certificate..." to bring up the dialog box. Enter a starred domain name for the certificate:
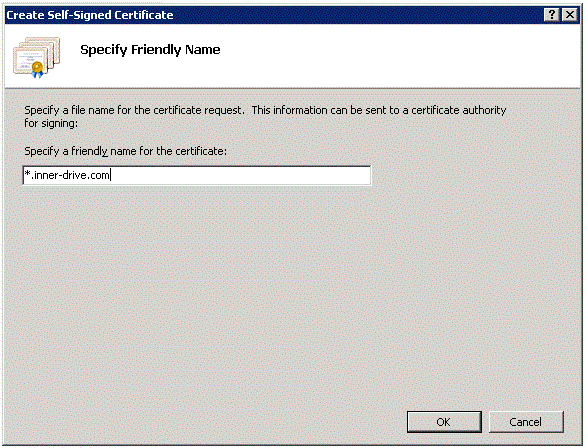
Once you click OK, you've got a self-signed certificate that IIS can find.
Step two: Open the right dialog box
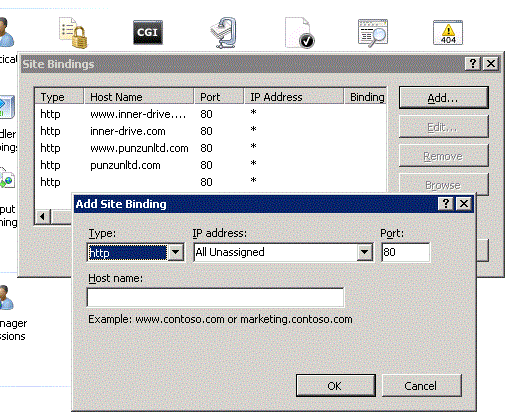
Expand the list of sites in the Connections (left) pane, and click on the site you want to assign. In the Actions (right) pane, click on "Bindings..." This brings up the Bindings dialog box. Now click Add, to bring up the Add Binding dialog box:
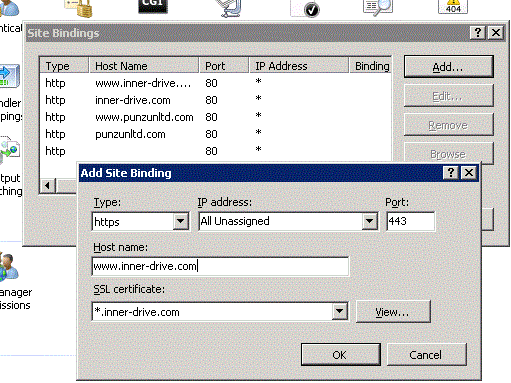
Step three: Click OK
Drop the Type box down to "https." Enter the specific host name for the site, and choose your starred certificate:
That's it. Seriously. And anyone who's ever dealt with this configuration crap before will understand my teary-eyed joy.
Copyright ©2026 Inner Drive Technology. Privacy. Donate!